• Home
  • About
  • Resources
    • Resources
    • Certifications
    • Go Local
  • Events
  • Contact
Fair for All Guide

pursuing a connected & responsible life

make it work

Make It Work: Ceramic Crock

March 10, 2015 by Julia Leave a Comment

Adding a Glitter Stripe to a Ceramic Crock

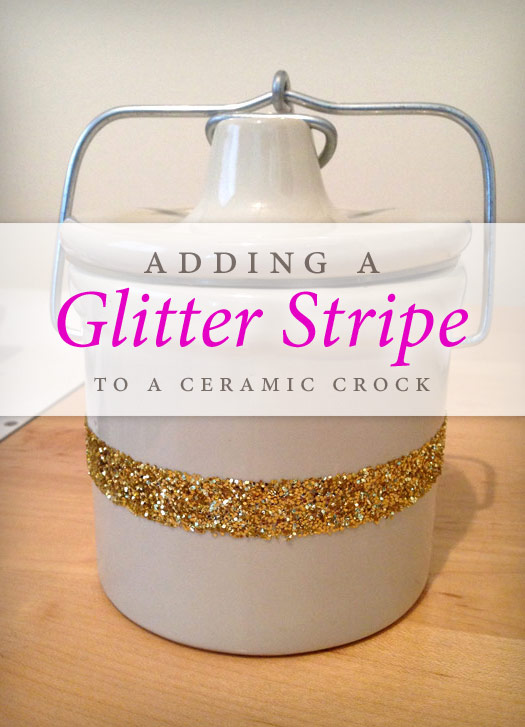
At my company, we have a Christmas tradition of sending out ceramic crocks containing tubs of cheese spread as customer appreciation gifts. We ended up with some extras and being the waste-not, want-not girl that I am, I took one home. I’m still working through the cheese itself (“cheese food,” technically, according to the package), but I took a liking to the ceramic crock and wanted to see if I could transform it into something less logo’d and more reusable.

Ceramic crock and supplies

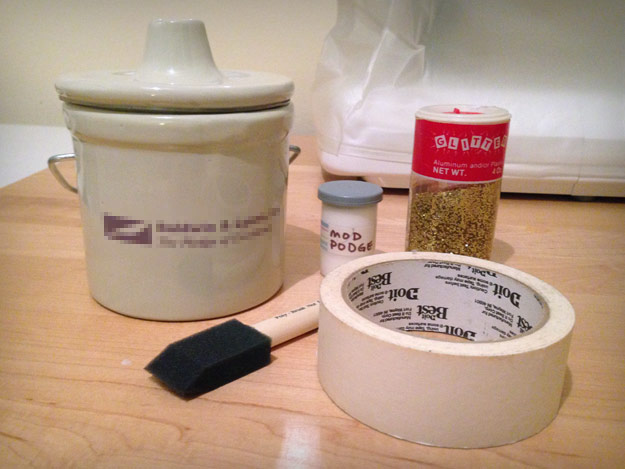
I’ve been itching to glitterize something for a couple of months, but I hadn’t picked a project yet, since I didn’t want to turn something recyclable into something unrecyclable by covering it in glitter and glue. I decided I would only glitterize something that was already unrecyclable… like a ceramic crock! I determined that a stripe of gold glitter around the circumference of the crock would be the perfect way to cover the logo. The supplies needed were minimal:

  • Glitter
  • Mod Podge
  • Foam brush
  • Masking tape
  • Newspaper

I got my glitter and Mod Podge from Indy Upcycle, a local shop that resells unwanted craft supplies. It’s one of my absolute favorite stores: not only is the concept ingenious, but it reduces waste, it allows me to do DIY projects without supporting mass production of craft supplies, the prices are dramatically lower than retail, and you’re encouraged to buy only what you need (which is why I have a film canister of Mod Podge instead of a huge jar). I highly recommend looking to see if you have a similar store in your community, and if you don’t, maybe start one, because this idea is golden!

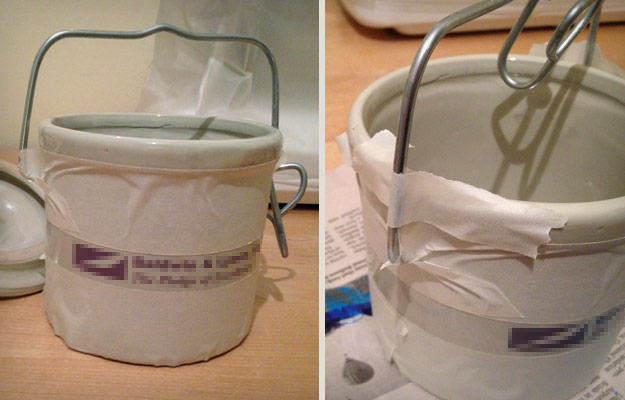
I began by using the masking tape to mark the edges of the stripe. You could also use painter’s tape for this; I just happened to have masking tape. I wasn’t terribly precise, and the stripe turned out a little crooked as a result. If you want it to be perfectly straight, I recommend measuring. I also taped the handle so it would stay upright and out of the way.

Ceramic crock with masking tape

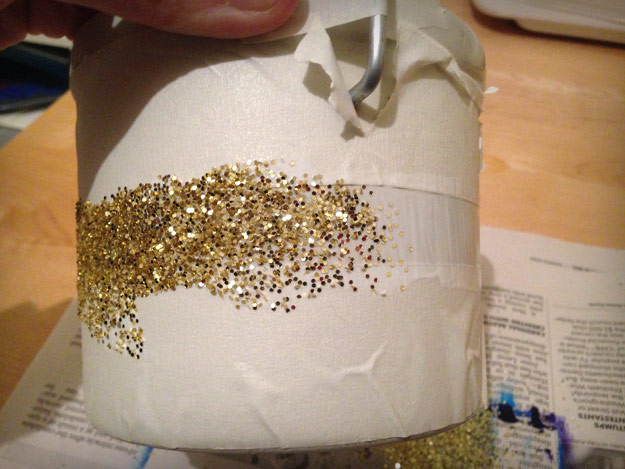
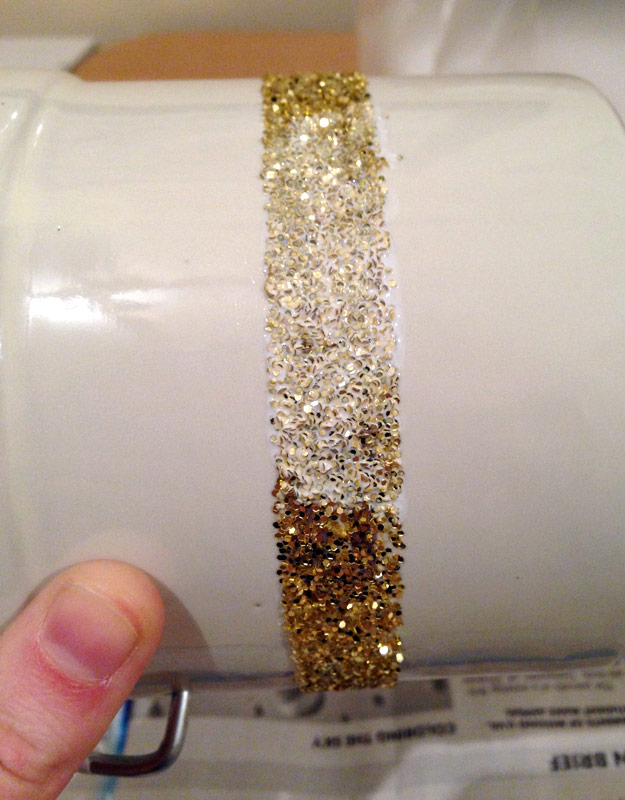
Next I used the foam brush to paint on a thin layer of Mod Podge. I was surprised by how little Mod Podge I needed. Then I started sprinkling on the glitter. Do this over newspaper to catch the extra glitter! Otherwise you will have a tragic (yet sparkly) mess.

Ceramic crock with Mod Podge and glitter

After the glitter was on, I waited a couple of minutes for it to set, then I peeled off the tape (except for the tape holding the handle upright). While the Mod Podge was still pliable, I used my fingernail to adjust a couple of particularly crooked parts of the stripe.

Ceramic crock with gold glitter stripe

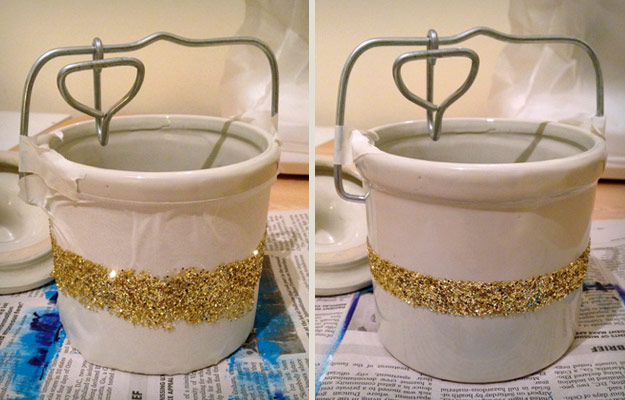
I waited about 10 minutes then applied a topcoat of Mod Podge, again using the foam brush. The topcoat keeps the glitter from flaking off, which is especially important because I plan to use the crock around food. Nobody likes glitter in their salsa.

Mod Podge topcoat over glitter stripe

I waited a couple of hours for the Mod Podge to fully dry, then ta-daaaa!

Finished ceramic crock with gold glitter stripe

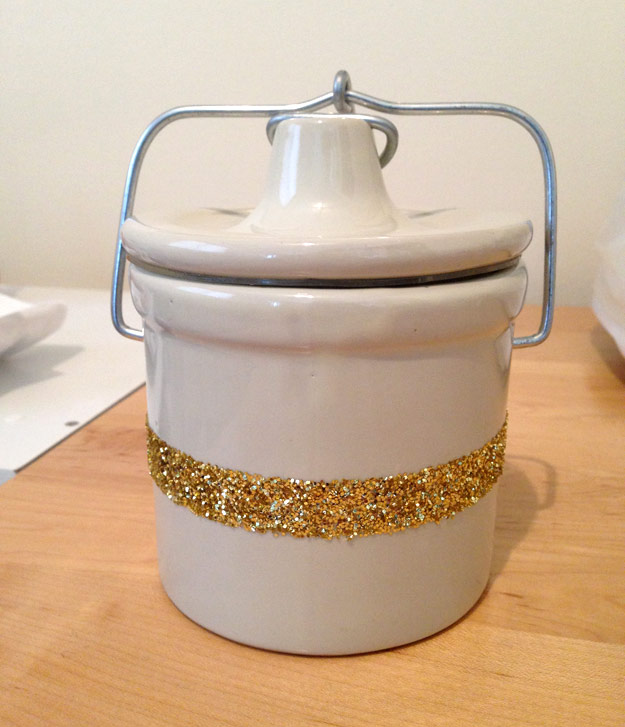
The project took about 30 minutes of active time, plus drying time. Even with the topcoat, the glitter is by no means waterproof, so I envision using it in ways that will only require me to wipe out the inside. For example, I could keep dip cool during a party by putting a few ice cubes in the bottom then the container of dip on top, or I could use it for dry snacks like nuts or candy.

I feel much better now that I’ve got some glitter in my life. Have you ever turned a logo’d promotional item into something you like and use? Does anyone else get an insatiable urge to cover things in glitter?

P.S. I’m finally getting on the Bloglovin train, so follow my blog with Bloglovin if that’s your reader of choice!

Posted in: Upcycling & DIY Tagged: make it work

Make It Work: Skinny Dress Pants DIY

January 13, 2015 by Julia 5 Comments

I have always been afraid to alter a pair of pants—I always have a vision of me sitting down in public and rrrrrRRRIPP! There go my new seams. But recently I found a tutorial on Pinterest that made me think, “OK, maybe this can work!” (I apparently forgot to pin the tutorial I looked at, but there are a bunch if you search for “skinny pants diy.”)

My subject for this project was a pair of gray dress pants I’ve had in my closet for longer than I can remember. I got overzealous to start the project and forgot to take a before photo, but just imagine the floppiest possible wide-leg dress pants from 2002 that are also 3 inches too long and you’ll have the right idea. The pants have a pattern that I’m not sure how to describe—I’ll call it teeny tiny houndstooth. My goal was to take these floptastic pants and turn them into chic slim-leg pants I could wear to work.

The first step was to turn the pants inside out and mark where I wanted to new seams to be. To do this I took a pair of pants that had a fit similar to what I wanted, turned them inside out as well, and laid them on top of the dress pants. I lined up the outside edges of both pairs of pants and marked about an inch outside of the inner edge.

I forgot to take a photo of the pants lining up as well, so enjoy this fine gif!


To mark my seam I used a white art crayon I had leftover from college, but tailor’s chalk or a fabric pencil would be the traditional seam-marking media. One thing to note is that these pants already fit me well in the waist and hips, so I only needed to alter the legs.

After I pinned the pants, I tried them on inside-out to check the fit without messing up the pins. Trying things on when you’re altering them is important! When I had the pants on I realized I needed to continue pinning all the way up to the crotch. (I had originally thought I could end my seam mid-thigh, but it looked totally bunchy and weird.) You never know what you’re not going to realize until the pants are on, so don’t skip this!

Once I had all the pins in place for a good fit, I used my sewing machine to create the new seam. I used a standard straight stitch. First I sewed along the line where I had pinned, then tried the pants on again (this time right side out) to confirm the fit. After that I sewed a second straight seam about a quarter of an inch outside the first seam. This reinforces the seam to prevent that rrrrrRRRIPP! moment.

Two seams about a quarter of an inch apart

Two seams for extra strength!


Make sure your second seam is outside the first seam. If you put the second seam on the inside, the pants will suddenly be too tight! After putting in the second seam, I tried the pants on again just in case, then trimmed off the excess fabric.

My pants now had slim legs but were still way too long.

Ankle view of skinny dress pants: still too long!

To fix the length I followed general instructions for hemming a pair of pants. This was my first attempt at hemming, but there are tons of online tutorials and YouTube videos that explain how to do it. Basically you fold up the hem to where you want it, pin it, make sure it’s the same length all the way around, then use a slip stitch (also known as a blind stitch) to hand-sew the new hem.

Pinned hem of dress pants

The whole project took maybe 4-5 hours spread over two days. As usual for me, much of that time was spent re-pinning. Once you start actually sewing, you’re in the home stretch!

Here’s the finished product:

Finished dress pants front view

Finished dress pants side view

I’m jazzed about how these turned out. Before when I wore these pants I felt like I was 15 years old and had come straight out of the juniors department. Now they’re modern and work appropriate!

Have you ever been brave enough to alter a pair of pants? After the success of this project I’d definitely be willing to try it again.

Posted in: Living Simply, Style, Sweatshop-Free, Upcycling & DIY Tagged: make it work

Make It Work: Elbow Patches

November 11, 2014 by Julia 2 Comments

A few weeks ago I posted some in-progress photos of my elbow patches DIY project. I’m finally done and I’m stoked about the finished product!

Front view of elbow patches

Back view of elbow patches

I used fabric from my extra fabric stash (this was specifically from an old polo shirt) and sewed the patches on by hand. Sewing the patches on took about two hours. It was a little awkward to find a way to sew onto the sleeve without accidentally sewing the sleeve shut, but I eventually got a system down. Putting a piece of paper inside the sleeve as a barrier helped me avoid catching the other side of the sleeve.

Elbow patches closeup

If you’re thinking about trying some upcycling/DIY projects, I recommend starting your own fabric stash. Mine is composed primarily of old shirts that were unfit for donation because of stains or because I’d already cut off pieces. I’ve used extra fabric to create pillow stuffing, parts of Halloween costumes, and now these patches.

I’m excited to have my white cardigan back in commission. Because I used a neutral fabric for the patches, I think I’ll be able to wear it with most of the things I wore it with before. And now if the other sleeve develops a hole, no one will know because it’s already patched! *fist-bump-and-explode*

Have you ever saved an article of clothing with a DIY solution? And have you ever tried to take a photo of your own elbows? It’s not easy…

Posted in: Style, Sweatshop-Free, Upcycling & DIY Tagged: make it work

Make it Work: Upcycling & DIY

October 14, 2014 by Julia 3 Comments

Beyond just making new purchases ethically, over the last year or so I have become interested in the idea of only making purchases that are necessary. I’ve become much better at avoiding thrift store impulse buys, and I discovered a local store that sells donated craft supplies (shout out to Indy Upcycle!), which has piqued my interest in upcycling and other crafty DIY projects.

The last time I took a bag of stuff to the thrift store to donate it, I was overwhelmed by the immense pile of donations in the back that had yet to be processed. I wasn’t crazy about the idea of my stuff sitting in that pile for months before making it to the sales floor—I had good stuff in there! That got me thinking about how often I had donated to Goodwill recently and if there was another way I could handle items I did not want for one reason or another. That was when I started thinking about tailoring and upcycling. My goal for the immediate future is to try to work with what I already have, instead of running out to Goodwill to get something new.

Green button-down shirt tailored

The shirt post-tailoring. Note how I was too lazy to make a new bobbin with green thread and used black for some of it instead. Not pictured are all the seams I had to rip out and do over.

I recently had a green button-down shirt that I liked but was too big. It was supposed to be fitted and tailored but it had a bunch of extra fabric flopping around. I thought about donating it, but then I thought, “If this shirt fit, I would actually be fine with it. Can I make it fit?”

After a three-hour marathon sewing session (I have very little sewing knowledge, so there was lots of trial and error), I was successful! The shirt now fits (at least more than it did before) and it’s one less thing I feel the need to get rid of. I like to think Tim Gunn would be proud of how I made it work.

On the heels of this success came another challenge: Last week I got a hole in the elbow of my white cardigan. A sweater with a hole in it isn’t a great donation, so I thought it was destined for my fabric scrap pile when I had a brilliant idea: elbow patches!

I’m only halfway through the project (okay, maybe a third of the way—all I’ve done is pin one patch), but I wanted to share my progress.

Elbow patch pinned onto sweater

I did sew the hole shut before I pinned on the patch. It’s really hard to pin an oval, by the way.

Have you done any tailoring or upcycling projects lately? Have you ever saved something from the scrap heap with a crafty solution?

Posted in: Upcycling & DIY Tagged: make it work

Blog Archives

Categories

Like Us

Like Us

Stay Connected

Enter your email address to receive notifications of new posts.

Make sustainability part of your event's success story

Copyright © 2025 Fair for All Guide.

Omega Child for Fair for All Guide WordPress Theme by Julia Spangler


Loading Comments...