Making It Do: Cardigan Repair DIY with Lace Edging

On her quest to make ethical clothing choices this year, our contributor Bethany is back with some tips for giving new life to clothes you already own. Enjoy! — Julia


Use it up, wear it out, make it do, or do without.

I love that saying. It comes out of the depression era, and I find myself saying it often (especially when I’m tempted to purchase something new that I don’t really need).

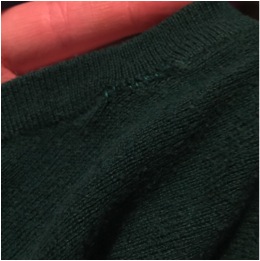
Cardigans are a staple of my work wardrobe. The office I work in has odd temperature regulation, and I’m pretty sure the elusive thermostat (no one knows where it is located) is set to “Antarctica.” Recently, I pulled out my favorite green cardigan and was shocked to find little holes where the collar is attached.

Hole in sweater

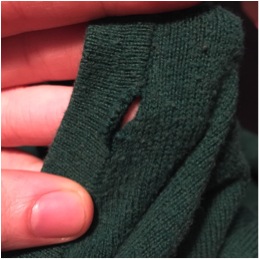
My first instinct, I’m sorry to report, was to throw it away and buy a new one. As I was considering it, that saying popped in my head, and I knew that I could definitely make this cardigan do if I put a little effort into it. I’m not very good at sewing, but I have a grasp on the basic “thread needle, stick in cloth, try not to make it look too horrible.” I quickly sewed up the little gaps, but I wasn’t satisfied with the result. You could see the repairs, partly due to me not having an exact color match for the thread, and in a few places it made a little bit of puckering in the fabric.

Poorly sewed-up hole

Sure, it would “never be noticed from a trotting horse” (another depression-era saying), but I don’t know many people who ride trotting horses through offices. I set the cardigan aside to think, and wore something else to work that day. I hit on a solution a few days later, and started working on it. A long time ago, my grandma taught me a fiber craft called tatting. It’s basically tying knots in string to make doilies, but you can use it to make edgings and lace as well.
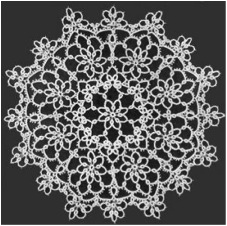
Fancy tatted doily

Fancy tatted doily

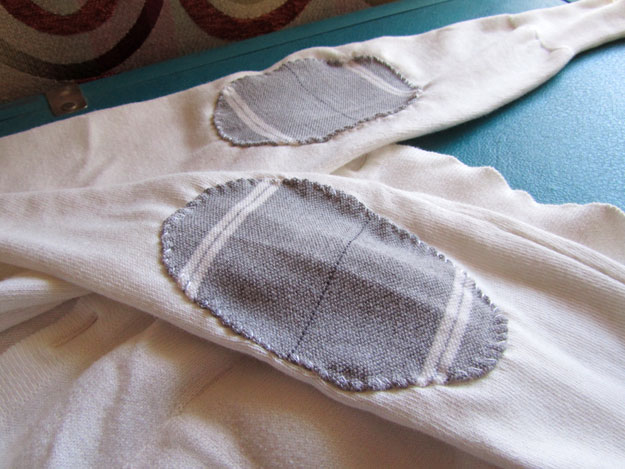
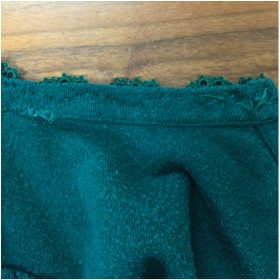
So I found some green thread that matched my cardigan, and made an edging for it, and then sewed the edging onto the cardigan to hide those unsightly holes.

Section of tatted lace and tatting shuttle

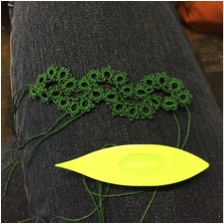
The beginning of the piece. The light made it look brighter green than it actually is.

Tatted lace on edge of cardigan collar

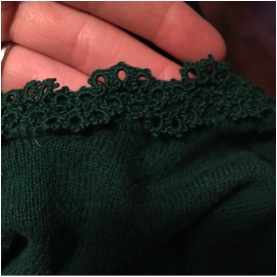
Finished and attached to the collar
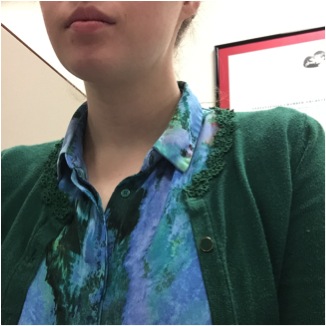
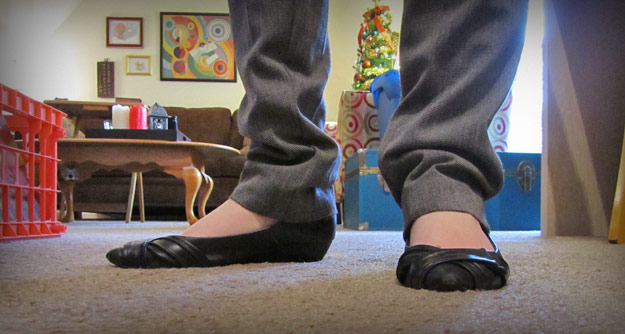
Bethany wearing cardigan

Cardigan in action!

By this point, you’re probably rolling your eyes and thinking “well, that’s great for you that you have this oddly specific skill that was passed down through generations and you sacrificed seven goats for the nimble fingers and coordination needed to make lace…but there’s no way I can do that.”

Never fret! Often you can find miscellaneous lengths of lace trim and rickrack at thrift stores that would do this exact same thing without the labor intensiveness. Go to the back of the store and look around where they display the sheets/tablecloths/fabric remnants. There are often bins of miscellaneous crafting materials that are perfect for little jobs like this.

You don’t have to be great at sewing, so don’t be intimidated by that. You may need to practice a little bit, but small repairs and refurbishments like this are pretty forgiving. Take a look at my stitches inside:

Poor stitches on inside of cardigan

I am not a master seamstress by any means. Just keep in mind that it’s better to err on the side of smaller stitches and using manageable lengths of thread (even though that means you’ll have to knot the thread and re-thread the needle more, it makes it more secure). Here’s a tutorial with a few basic stitches that I use a lot, particularly the whip stitch.

I found a lot of satisfaction in making this with my own hands. I found that this cardigan quickly became even more of a favorite because it now has a story. Instead of a cheap throwaway piece of fast fashion that only lasted one season, I was able to fix it and refurbish it into something that I’m excited to wear again.

If you’re interested in learning to tat, there are plenty of tutorials available online. This one is pretty clear and easy to follow. Video demonstrations like this are particularly helpful when first learning. I would also encourage you to think about what random skills you have that could be applied to hide a repair or freshen up a piece of clothing that you’re tired of. Do you make beaded jewelry? Maybe you could make a beaded collar. You could crochet pockets for a dress or maybe use a contrasting color of thread to sew up holes and make an interesting effect. How can you “make it do” with the pieces you already have in your wardrobe and extend their lives?

Introducing Bethany, our new contributor!

I’m thrilled that my good friend Bethany Daugherty is joining the Fair for All team as a contributor! She will be sharing periodic updates as she goes on a mission to buy only ethically-made or secondhand clothing this year. Here’s Bethany’s introduction to her quest in her own words. — Julia


Three years ago, I texted a number off of a really sketchy looking flyer that was posted on a bulletin board at the college I was about to graduate from. The flyer was very vague and plain, and said “Looking for a bass player for a bluegrass band. Text Kevin at 317-XXX-XXXX.”

I had just stolen a string bass, and was looking for more opportunities to learn how to play it. Okay, okay, I didn’t really steal it…I actually borrowed it from my mom and then never gave it back (thanks Mom!). I texted the number. This Kevin character texted back, and it was all set up for me to attend the first rehearsal at his house. All I could think was “I’m probably going to get murdered and killed.” Then I got another text asking if I had any food allergies. Murderers don’t care about food allergies! Little did I know that texting a random person from a sketchy flyer would turn out to be one of the best decisions I’ve ever made. And guess who was also a part of this band?

Group photo of Juvin: The One-Man Band

Bethany (left) with her quasi-stolen bass and the band

That’s right, none other than the lovely Julia Spangler! Over the past three years, we have become good friends, and I started reading this blog. When she screened “The True Cost,” I attended, and it was really eye-opening for me. Over the past six or seven months, I’ve had a Dr. Seuss quote stuck in my head:

Even though you can’t hear them or see them at all, a person’s a person, no matter how small.”

It really reminds me of the issues that were presented in that film. I can’t hear or see or know the people who are at the other end of the goods that I consume, but I can’t pretend they don’t exist.

In 2016, I’m tackling the sartorial issue head first—I am choosing to take responsibility for every dollar I spend, and committing to not purchase any new items of clothing unless they are fair trade. I’ll be relying on thrift shops, clothing swaps, and fair trade retail…and making do with the clothing I already own! You can look forward to upcoming blog posts throughout the year about my progress, what I learn through this process, and various DIY posts as I spruce up the clothing I own.

Bethany browsing tables of clothing

Bethany swappin’ it up at FairSwap15

I’m pretty new to all of this, and I’m still learning all the ins and outs on my quest to take responsibility for my own wallet. I still make mistakes, and I still occasionally buy something that I’m not entirely sure where it came from. Some of the challenges I’m anticipating are finding work-appropriate pants (that fit correctly and are not giant bell bottoms), blue jeans, undergarments, exercise clothing, and shoes. I’m only one month into this challenge, and it already sometimes feels overwhelming, but at the end of the day it helps me sleep at night to know that I’m doing what I can to treat those invisible and silent people with respect.

Waste Not, Want Not: Vegetable Stock from Kitchen Scraps

After reading Faye’s excellent post about making vegetable stock on her blog Sustaining Life, I was inspired to attempt it myself. And just in time too: I’ve made soup a couple of times this fall already and using plain water definitely leaves something to be desired.

I’ve never been a fan of purchasing stock from the store because it seems like a lot of packaging, either an unrecyclable carton or multiple cans. A couple of people have recommended bouillon cubes, and I agree those would probably be a good option. However, I like the idea of using the scraps of all the produce I’ve already bought. It’s like making something out of nothing!

As Faye advised, I stored my scraps in a plastic bag in the freezer. It took me about a month to collect enough to fill the bag. Here’s the collection I ended up with:

Vegetable scraps frozen in plastic bag

I reuse tortilla bags for everything.

I followed Faye’s recipe, first seasoning and roasting the scraps in the oven, them simmering them in water for a little over an hour.

Frozen vegetable scraps in a Pyrex baking pan

Some scraps I included were a pumpkin rind, a few apple cores, red and green pepper stems and membranes, onion ends, and rutabaga peelings.

Vegetable scraps in pot with water

Vegetables in pot after having been simmered

I could tell it was working because my apartment started to smell like delicious soup. After letting the stock cool, I removed the big vegetable chunks with tongs and then poured the remainder through a strainer.

The finished stock is a lovely golden brown and has an oh-so-slightly sweet flavor, probably due to the apple cores. My only puzzlement with the process is that I put in 8 or 9 cups of water and ended up with only 5 cups of stock. One culprit may be the fact that the lid to my stock pot has steam-release holes in it. The stock also came out a little more oily than I expected, which I’ll take as a lesson to lighten up on the olive oil during the roasting step. (I eyeballed it instead of measuring—a classic blunder. Come to think of it, I eyeballed the water amount too…)

Homemade vegetable stock in plastic container

The whole process was very easy and didn’t make a mess. Now I have tasty stock to use for making soup, rice, or anything else that could use a flavor boost instead of plain water, and I didn’t use anything other than scraps I would have thrown away. I definitely plan to continue collecting scraps for my next batch!

If you want to try it yourself, be sure to check out Faye’s post for the specific recipe and a helpful list of what veggies not to include in stock.

Have you ever made your own vegetable stock? How cool is it to make food out of [clean, edible] garbage??

Zero-Waste Wall Art

Zero-Waste Wall Art header

Over the last several months I’ve been pursuing two different aspects of personal development: revitalizing my creativity and reducing the amount of waste I generate. I’ve also been trying to combine these two pursuits, which led me to ponder ways I could create art without also creating waste.

I had recently made myself an Indiana wall-hanging with nails and plywood when my sister commented that her husband would probably like a similar piece of art in the shape of California for his upcoming birthday. (It’s already come and gone, so this post isn’t a spoiler.)

From a Facebook query asking for supplies, I discovered that one of my friends has a lapsed woodworking hobby. He was happy to give me a big scrap of plywood as well as the small wood pieces I attached to the back. (The backing pieces keep the plywood off the floor when you’re nailing and keep the nails from scratching the wall when you hang the finished piece.)

Reclaimed plywood with scraps attached for hanging

Reclaimed plywood with scraps attached for hanging

I printed the outline of California tiled on four sheets of paper so it would be big enough for the piece of wood. I made X’s on the outline where I wanted nails to go; I think it was about every inch. Having the nail placements marked was helpful so I didn’t have to eyeball it as I went. I taped down the outline and hammered a nail all the way through the plywood at each X.

In-progress shot with nails all the way around the outside of the shape

I nailed right through the paper—it was easy to tear off when I was done.

I then tore off the paper and was left with just the nails creating the outline. I spent some time experimenting with how I wanted to make the shape visible. Should I do zig-zags in the interior of the shape? Just a border around the outside?

Side-by-side comparison of zig-zags vs. outside border

I decided to do both techniques together. The zig-zags are embroidery thread, which I attached by simply knotting it to one of the nails. The outside border is some white binding tape I had in my craft drawer from years and years ago (when I mistakenly thought binding tape would have adhesive properties—protip: it does not). I wove the binding tape around the outside nails and then hand-sewed it at the corner so it would sit flat, rather than having a big knot.

Straight-on view of finished wall-hanging

The finished product

Materials used:

  • Reclaimed wood from a friend’s garage
  • Made in USA nails I already had (plus a few I borrowed)
  • Four sheets of paper
  • White embroidery thread I already had
  • White binding tape I already had
  • White thread I already had

Wall hanging on wall in living room with couch and lamp in background

One thing I like about this piece is that it can theoretically be disassembled and the components reused. I used no glue, so none of the elements are fused together inseparably.

I had been looking for a way to use a large quantity of the nails, which I bought without realizing they are “finishing nails,” which means they don’t have a head and are therefore difficult to pull out of the wall. Apparently Americans only make specialty nails, not basic ones for hanging pictures, so this was the most normal style I could get that was made in USA. (I’m not sure if it was more or less wasteful for me to buy 500 impractical American-made nails instead of 50 Chinese-made nails that were actually what I wanted.) I did have to borrow a few nails from a friend to attach the backing pieces because my nails were too long.

Side view of wall hanging showing backing piece

The side pieces on the back help stand the wall hanging off the wall so the nails don’t scratch it.

Technically I did waste a few pieces of Scotch tape, which I used to tape down the outline of the state, and I did have to recycle the paper after I tore it off. But overall I bought no new materials, found purpose for items that could have gone in the trash, and ended up with a minuscule amount of waste (not to mention a super-cool gift for my bro-in-law).

What DIY projects have you created lately? Are you working any zero-waste ideas into your lifestyle?

My Favorite Ethical Pinners on Pinterest

favorite-ethical-pinners-on-pinterest

I have a confession to make: I am teetering on the brink of a Pinterest addiction. I make a conscious effort not to rely on my phone for constant distraction, but I do find myself checking Pinterest at least 3-4 times most days. Despite its drawbacks, like the fact that it helps exacerbate a culture of aspirational consumerism and feelings of inadequacy, I find it to be both entertaining and helpful for the following reasons:

  1. Even though the majority of items in my feed aren’t ethically made, pinning things I like gives me an idea of what my own personal style is. I can then look for ethical alternatives or DIY projects that would give me a similar look.
  2. There are tons of tutorials for DIY projects, including recycling/upcycling projects and basic sewing tutorials, both of which I am all about right now.
  3. It’s a great source for finding artwork and photography I wouldn’t have seen otherwise.
  4. I like evening gowns, and Pinterest shows them to me!

There are a few pinners I follow in the ethical lifestyle realm who I can always count on for interesting pins. Here are some of my favorites:


Fair Trade Quilts & Crafts – This account was fully responsible for me embracing aspects of bohemian interior design. The gorgeous interiors they pin give me inspiration for creating a home full of eclectic fair trade and secondhand items.

Visit Fair Trade Federation’s profile on Pinterest.

Fair Trade Federation – The FTF uses Pinterest to showcase cool products from their members.

Mata Traders – I frequently find myself re-pinning links to high-quality blog posts about fair trade pinned by Mata Traders.

Visit Elizabeth Stilwell | The Note Passer’s profile on Pinterest.

Elizabeth Stilwell | The Note Passer – I love Elizabeth’s pins that link to blog posts about zero-waste living.

To follow me on Pinterest, hit me up here! Full disclosure: not everything I pin is ethically-made, since as I described above, I use Pinterest to figure out my style, not to make a specific shopping list. My board Fair Trade & Ethical Lifestyle is devoted to ethically-made products and related links. (And if you’re looking for some evening gown eye candy as well, my Wearables board is where it’s at.)

How do you use Pinterest? Who are some of your favorite pinners?